Showing posts with label Cousin. Show all posts

Monday, March 4, 2013

A Foreign Beauty

I have this tendency to lean towards ancient jewelry designs.  The the necklace I created while at Cousin Corporation is no exception.  We had an hour to complete a design with the designers at Cousin.  We had such a good time.  We were allowed to peruse the bead library for our pieces.

This is what I came up with:


 I was so inspired when I saw this pendant.  The entire necklace flowed from it.  I found all sorts of goodies that matched the theme of the pendant.  I loved the spirals at the bottom and the way the sets are placed around the teardrop shape.

The chain was very different than what I am used to working with.  The links were very tight with these little tiny rondelles set in perfectly spaced intervals.

I fell in love with these enameled brass discs. I also found lovely oxidized brass discs.  The brown leather went well with the theme. I found some very interesting knotted look, cord covered beads. The antiqued brass sliders were so lovely, I had to use them too.

I couldn't believe how well this necklace came together. We ate lunch while we worked too so the pace was very relaxed.  Before we knew it, time was up and my piece was complete.  I am very happy with the way it turned out.  I hope you like it too.


Friday, February 15, 2013

Prima Bead - Bead and Button Show Project - Part One!

In early February, I posted about a new project for Cousin which would be our "biggest assignment to date."  I'm super excited and super nervous about being able to create something that will be displayed at such a prestigious event.

While I sorted my supplies, I ran into a problem.  The color of some of the pearls were off.  I had ordered dark blue/navy and what I received was dark teal/green color.  Turns out I had a mislabeled batch.  Oops.... I reached out to one of my contacts there at Cousin/Prima Bead and he quickly sprang into action to make sure the other pearls were labeled correctly for other customers and find me a perfect match for what I wanted.  Within a few days, I received my new goodies.  But the fact I had off colored items didn't stop me from creating a beautiful piece from the pearls.  So now I have two necklaces for Cousin to choose from.  Below are the progression of each necklace from idea conception to finished beauty.

The beginning of the first one:
This was the focal design I came up with and the rest of the necklace flowed around it.  Sterling Silver fancy head pin, filigree heart connector and eye pins were used with a 10x8mm Crystazzi Dark Sapphire teardrop bead, huge 20 mm glass pearl and a 6x8mm Crystazzi Light Sapphire rondelle.
I came up with a pattern using 6mm deep teal, light turquoise, and white glass pearls.  I knew I wanted to use a collar style necklace as the base for this piece to give it a Victorian feel.

I used Beadalon's WildFire Thermally Bonded Bead Weaving Thread in Frost 10 lb., 15mm with a #12 beading needle.


I created a Right Angle Weave using a base ring of four pearls then adding in three at a time until I reached the desired length.  I then went back in and added 4mm round A/B finished Swarovski clear crystals and 4mm bicone Crystazzi Light Sapphire crystals.


I added in dangles along the sides using 10x8mm Crystazzi Dark Sapphire and Clear A/B tear drops accented with 4mm bicone Crystazzi Light Sapphire crystals and 4mm bicone A/B clear crystals. I draped a Sterling Silver link chain from the Elegance Metal line in the design.

Bit by bit, it all came together.  I continued to add in various colored glass pearls, crystals, and even some Jewelry Basics acrylic beads.


Thursday, February 7, 2013

New Project!

Okay...I received my February/March project information on Friday, February 1st.  This is going to be the Creative Circle's "Biggest project to date" as our contact at Cousin told us in our email.

This is the exact quote from the email detailing what this project is about. 
We want to feature YOU at our Prima Booth at the Bead & Button Show in June!!!!!!!!!!!  Each necklace will be a major focal point of the booth complete with a name plate of the designer!

Assignment:
-Create a show-stopping Necklace that will be featured at the Prima Booth at the Bead and Button show.  We want something that will WOW them and grab everyone’s attention!
-The piece must retail between $300-$500
-No earrings or bracelets it must be a Necklace.
-Once you have completed the necklace we will send you a call tag to ship it to Cousin headquarters
-The assignment will be due on April 1st

After the initial panic wore off and I composed myself, I researched some trends and decided to create something blue. My next step was to requisition the materials I was going to need from Prima Bead and wait for them to come in.  Today my goodie box came!  I was so excited.  I must have looked like a kid at Christmas when the UPS driver arrived at my door.


As the project progresses, I will post photos.

Wednesday, October 24, 2012

Second Halloween Project

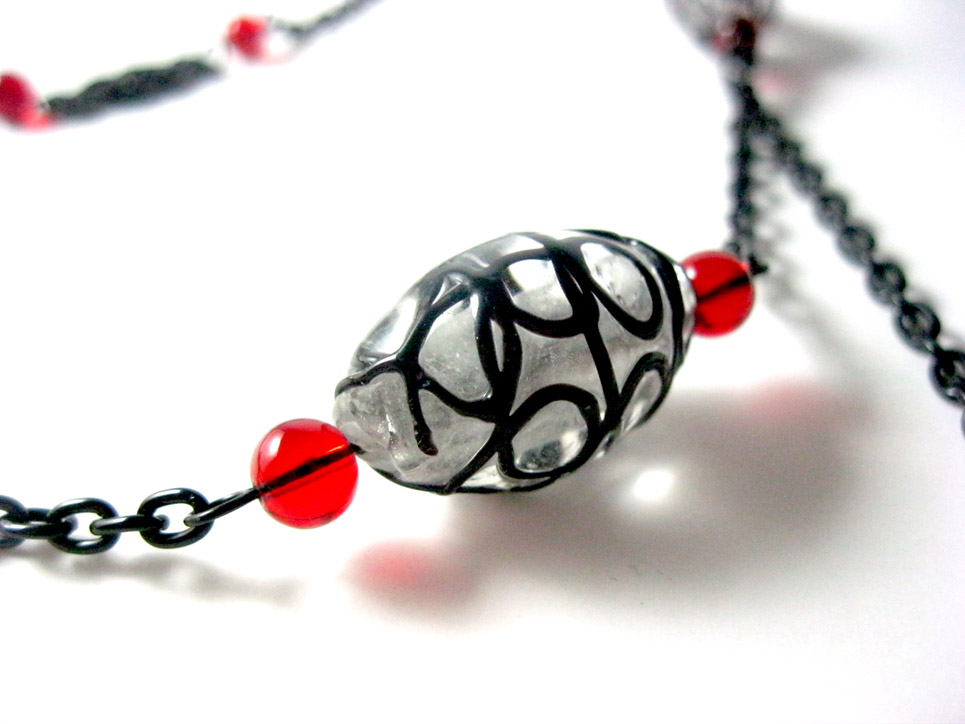
I posted earlier about Cousin sending all of us ambassadors a lovely box of goodies for us to create a Halloween themed project for the month of October.  I ended up making two different items.  Below is the second item I created.  It's a lovely black and red, Goth style necklace.  Make sure to visit the Cousin website to see all of the ambassadors' amazing designs for this month's project.  Complete instructions for this piece can be found on their site and below.

Supply List
Jewelry Basics
34713087 – Glass Beads: 85 pc 6mm Round Red
34708423 – Metal Beads: 3 pc Metal Bead Black Lace Spacer
34718004 – 100 inch Small Oval Chain in Black
37450212 – 17 inch Black Metal Filigree Connectors
36127150 – 9" Clear/Black Glass Ovals
34719103 – Findings 145 pc Starter Pack in Black

Tool List:
Round Nose Pliers
Chain Nose/Needle Nose/Flat Nose Pliers
Parrot Beak Memory Wire Cutters (for cutting chain)

Instructions for Necklace:  Make all your connectors and dangles at the same time. Cut all the chain at the same time. Disassemble the filigree strand.  We are only using the filigrees not the beads.  You will be using the smallest jump rings from the Starter pack as well as the extender chain.


Cut the following sections of chain:
Ten 12 link sections
Two 15 link sections
Two 17 inch sections
Two 40 link sections (5 inches each)
One 79 link section (10 inches)
One 3 inch section from the extender chain

Make 11 Red Bead Connectors: (will be referred to as RB Connectors)
Thread a red bead onto an eye pin. Bend the pin to form a right angle. Cut the pin approximately 1/4 inch beyond the bead. Use the round end of your pliers to grasp the end of the pin and curve the pin by using a rolling motion to fold it over a single round prong. You may need to release the pin and continue the rolling motion again.

Make 2 Red Bead Dangles: (will be referred to as RB dangles)
Thread a red bead onto a head pin. Bend the pin to form a right angle. Cut the pin approximately 1/4 inch beyond the bead. Use the round end of your pliers to grasp the end of the pin and curve the pin by using a rolling motion to fold it over a single round prong. You may need to release the pin and continue the rolling motion again.

Make 2 Red Bead & Clear/Black Oval Bead Connectors:  (will be referred to as RB/CB connectors)
Thread a red bead, a clear/black oval bead and another red bead onto an eye pin. Bend the pin to form a right angle. Cut the pin approximately 1/4 inch beyond the bead. Use the round end of your pliers to grasp the end of the pin and curve the pin by using a rolling motion to fold it over a single round prong. You may need to release the pin and continue the rolling motion again.

Make 3 Red Bead & Black Lace Spacer Connectors:  (will be referred to as RB/BL connectors)
Thread a red bead on to a eye pin.  Thread the eye pin through one hole of the spacer and then add another red bead. Bend the pin to form a right angle. Cut the pin approximately 1/4 inch beyond the bead. Use the round end of your pliers to grasp the end of the pin and curve the pin by using a rolling motion to fold it over a single round prong. You may need to release the pin and continue the rolling motion again.  Repeat for the second hole of the spacer.

Construct 3 Red Bead and Filigree Connectors: (will be referred to as RBF connectors)
Take two RB connectors and attach to each end of a metal filigree connector by opening one loop of the RB connector and threading the filigree connector onto the pin.  Close loop.  Repeat for opposite side.

Construct 1 Red Bead and Filigree Dangle: (will be referred to as RBF dangle)
Take one RB connectors and attach to one end of a metal filigree connector by opening one loop of the RB connector and threading the filigree connector onto the pin.  Close loop.  Attach an RB dangle to the opposite end of filigree.  Set aside.

Using the smallest jump rings from the Starter pack, connect the RB/BL connectors together forming a strand. Note:  Use a side to side twist motion to open the jump ring and to close it back.  It's easiest to use two pairs of needle nose pliers. If you have one pair, you can hold one side with your fingers. If there is a gap, close it by moving the sides up and down pressing gently together. The ends should overlap then snap together tightly so the tension of the metal will hold the gap closed.

Attach one section of 12 links to each free loop of the RB/BL connector strand at both ends via jump rings.  Attach a RB connector to both sections of chain by opening the loop from side to side. String on another 12 link section and close the loop. Open the free loop of the RB Connector and attach another 12 link section of chain. Thread on one 40 link section of chain and close loop of RB connector. Open free loop of the RB connector just added and attach one 15 link section. Repeat on opposite side of RB/BL connector strand.

Use a jump ring to attach a lobster claw clasp from the starter pack to one end of the chain.  On opposite side, attach using a jump ring, the extender chain.  Attach one RB dangle at the end of the extender chain by opening the loop from the side and threading the pin through the last link of the extender chain. Close the loop.

At the end of one of the free 12 link sections, attach one of the RBF connectors and another 12 link section of chain. Add another RBF connector and another section of chain. Connect the free chain and the chain just added with the last RBF connector.

At one end of the 40 link section of chain, attach a RB/CB connector. At the free loop of the RB/CB connector, attach one end of the 79 link section and a 17 link section of chain. Attach another RB/CB connector and the next 17 link section of chain. Connect the 17 link chain to the last RB/CB connector and other end of the 79 link piece. Then connect the free loop of the RB/CB connector to the end of the other free 40 link section of chain.

Find the center point of the 79 link section. Open top loop of the RBF Dangle and thread it through the center link of the chain. Close loop.

Main body of necklace should fit snuggly to the neck like a collar.

Earring Instructions: Use ear wires from Starter pack and smallest jump rings.  Using the instructions from above, make 2 Red Bead Connectors, 2 Red Bead Dangles. Construct 2 Red Bead & Filigree Dangles. At top loop of RBF connector, attach a jump ring. Thread loop of ear wire onto the jump ring and close the ring.  Repeat for other earring.

Tuesday, October 23, 2012

The Halloween Project

Cousin Corporation sent us Ambassadors another box of goodies to work with to create a Halloween themed project complete with instructions.

 These projects are featured on their website here.

I ended up creating two different projects.  The first of which is currently featured on their site.  Click here to view it or you can view the photos and instructions below.

Along Came A Spider
  Supply List
18 gauge Artistic Wire Non Tarnish Red Brass Wire
20 gauge Artistic Wire Non Tarnish Red Brass Wire
Metal Gallery Liquid Gold Small Beads (LG)
BeadFix Glue
Black 11/0 Seed Beads (SB)
Black 8/0 E Beads (EB)
34709105 – Jewelry Basics 7pc Acrylic Amber Flat Faceted Beads
37450212 – Jewelry Basics 17in Black Metal Filigree Connector


Tool List
Round Nose Pliers
Parrot Beak Memory Wire Cutters
Flat nose pliers
Ruler

Cut and straighten the following:
One 8 inch piece of 18 gauge wire
Eight 6 inch pieces of 20 gauge wire

Disassemble the metal filigree stand. Use only the beads. Take round nose pliers and make a tiny loop at the end of the 18 gauge wire. Grip the loop firmly with the flat nose pliers. Use your fingers to roll the wire into a spiral moving the pliers as the spiral grows in size. Make four revolutions. Bend the wire slightly back to a 90 degree angle. Wire should be completely flat. Bend the straight end of the wire perpendicular to the spiral at a 90 degree angle. Then bend again to where the wire is now behind the spiral. Measure to the center of the spiral and bend the straight wire at this point. 

 Make a loop at the end of each 8 pieces of wire by rolling the end straight down.

Thread on one black E bead and one of the black faceted rondelle from the metal filigree strand. String on each of the 8 pieces of wire. String on the orange bead. Make a wrapped loop at the end of the wire. Drip glue over 8 loops of the 6 inch pieces of wires. Let dry. If you don't, it will be glued to your hand.

When glue has fully dried, separate the ends of the wires away from each other. On one of the front wires, string on three SBs, and a pattern of 1 LG, one SB repeated 4 times. String on one SB, EB, and then one SB. Thread on a pattern of LG/SB repeated 5 times. Make a bend on top of the last SB. Trim to 1/2 inch. Make a curl using round nose pliers. Repeat on all but the back two pieces of wire (one on the left and one on the right). On the back two pieces, follow the LG, SB pattern 4 times. Then add one SB, one EB, one SB and the same LG/SB pattern repeated 3 times. Repeat the SB/EB/SB pattern followed by LG/SB repeated twice and curl the ends. Bend the wires at the EBs at about an 45 degree angle on all but the back legs. At the bottom EB, bend in the opposite direction at about a 30 degree angle.

You can now either string up your spider on a piece of monofilament, or string on a necklace for a little fun creepy crawly Halloween accessory.


Wednesday, September 12, 2012

Make The Connection: Project Number 2


This month's project for Cousin was to do a review of their new "Make the Connection" line making its debut on HSN tomorrow, September 13th.  I fell in love with this product line.  It is super easy, especially for those who are craft impaired. 

Make the Connection is an "almost" ready-to-wear jewelry line!  Make the Connection takes the intimidation factor out of jewelry making by using NO tools and shows it doesn't have to be difficult or time-consuming to create unique, personalized jewelry. The kit offers four different jewelry elements: short connectors, long connectors, center connector and accent. The ring clasp connector on each end connects the pieces, to instantly create a piece of jewelry that reflects one's personal style, no matter what level of expertise.  You can create up to 30 pieces per kit in a flash.  Or mix the kits for even more possibilities.  With the "Formal" kit, one can change out one piece and switch your look from day to night with ease.  With the "Everyday" kit, one can create personalized on trend jewelry such as wrap bracelets and layered necklaces.  These kits are perfect for every age and skill level as they have no loose beads to string and require no tools.

The video review I made is here for you to view.  Please make sure you tune in tomorrow the HSN to view this great product.


Monday, September 10, 2012

Exciting Press Release Today from Cousin

Received this just a few moments ago and wanted to share the excitement!

INNOVATIVE CONCEPT IN JEWELRY KITS DEBUTING ON HSN’S “24 HOURS OF CRAFTS”
New Approach Lets You Create a Style Then Interchange Pieces for a Different Style the Next Day

FOR IMMEDIATE RELEASE

LARGO, Fla., September 10, 2012 – Imagine instantly changing your jewelry to fit your mood, style or wardrobe with just a few pieces at your fingertips. The Make the Connection line, a new approach to customized jewelry, will let you effortlessly switch up your look when two exclusive kits premier on HSN, HSN.COM and via HSN mobile on Thursday, September 13, 2012.

The Make the Connection kits contain several different jewelry components with a simple ring clasp on each end that instantly connect the components, creating a seamless necklace or bracelet that can be changed again and again, reflecting your personality, style or outfit.

The two Make the Connection kits making their debut on HSN and hsn.com are Everyday, designed to be colorful and on-trend, and Formal, designed to have a timeless, elegant feel. More than 30 combinations can be created from each style kit for only $19.95 each kit.

Make the Connection designer Michelle Simpson knows being stylish can be time-consuming and expensive and created the kits for HSN to help solve the ongoing fashion dilemma.

“Imagine putting on an outfit and knowing you can create a complementing piece of jewelry in seconds, and then creating a different piece every day for a month, all from the same kit. Make the Connection is about simplicity and variety at a value,” says Simpson.

Make the Connection will inspire jewelry lovers of all ages who want to complement their wardrobe with personalized jewelry without the expense of buying multiple bracelets and necklaces. For more information about Make the Connection on HSN, join the conversation on Facebook at Make the Connection on HSN.

Thursday, August 16, 2012

So, We've Been Thinking.......

One of my fellow ambassadors, Patty Squillante came up with a brilliant idea today.  It seems that she and I both were on the same wavelength.  Her idea was to have an open dialog with the public about the designs and projects we work on for Cousin.  It would be a place where other jewelry designers and novice jewelry makers could ask us questions about our design process and inspiration, how we incorporated the Cousin line of products into our creations, etc.

We have presented our idea to Cousin and can't wait to see this come to pass so you guys can participate with us on our journey. 

Wednesday, August 8, 2012

First Project

For our first project as Cousin Creative Circle Ambassadors, we were asked to create something that was Florida in theme.  We were also asked to use only the Cousin Corporation of America's brand products in our creation. We could use charms, beads, wire, etc. in creating our piece.

As I thought about this project, the only thing coming to mind were the beautiful colors I have seen while visiting the Fort Walton Beach/Destin area: emerald waters with silver crests lapping against beautiful sugar sand beaches that reflect the warm yellow glow of the sun and the most beautiful soft turquoise blue skies you will ever see.  At sunset, the waters reflects a burnished gold and the sky lights up a brilliant bronze color.


I went bead shopping on my birthday and found the perfect beads at Walmart. The colors of the beads I purchased spoke of the colors I mentioned.

I mixed some very pretty green swirl acrylic beads that were strung with antiqued silver beads and a deep green crackle bead with strands of yellow glass linked beads with antiqued gold accents.  I found some very petite strands of turquoise colored glass beads that were wire wrapped together on thin silver wire.  I already had the antiqued gold chain left over from a Crystazzi kit.  All the findings were pulled out of my box of goodies Cousin sent me as part of my ambassadorship. 
Here are the pictures of my finished piece.  Leave a comment on how you think I did.
Here is the full view of the necklace

What the necklace looks like on a neck form.

Close up of the right side of the necklace

Close up of the left side of necklace
Back of necklace
I had enough left over beads to make these pretty earrings too.